Export/Import Workflow
Export Workflow
The Export Workflow feature allows you to save a workflow with various levels of detail for different purposes, such as creating templates, debugging, or transferring workflows across environments. The export process provides flexibility through a dialog with three options to tailor the exported file to your needs.
Steps to Export a Workflow
Access Export Option:
In the workflow builder, click on the three dots menu at the top-right corner.
Select Export Workflow from the dropdown menu.
Export Dialog:
A dialog will appear, allowing you to choose one of the following options based on your requirements:
Export Options
As Template:
- Purpose: Use this option to export only the workflow structure and configurations.
- Contents:
- Node definitions and connections.
- Workflow-level configurations.
- Use Case: Ideal for sharing a clean template without session logs, assets, or data.
Configurations Only:
- Purpose: Exports the current workflow configuration along with session logs, services, and assets.
- Contents:
- Workflow structure and configurations.
- Session logs for debugging.
- Services and any included assets.
- Use Case: Use this option for debugging workflows on another system or sharing with NAZDAQ for support purposes.
Configurations with Data:
- Purpose: Exports the workflow, including runtime data and the option to include specific historical iterations.
- Contents:
- Workflow structure and configurations.
- Session logs, services, and assets.
- States (persisted workflow states).
- Iterations: Specify the number of most recent iterations to include.
- Use Case: Suitable for transferring workflows along with execution history and states, ensuring a complete replica of the current execution environment.
Export Workflow Dialog Example
| Option | Content | Best For |
|---|---|---|
| As Template | Configurations only | Creating reusable workflow templates |
| Configurations Only | Configurations + logs + assets | Debugging workflows or support |
| Configurations with Data | Configurations + logs + data + states | Replicating workflows with data |
Best Practices
- As Template: Use this for deploying clean workflows without historical or debug data.
- Configurations Only: Ideal for sharing workflows for troubleshooting without transferring large data.
- Configurations with Data: Use this when debugging requires runtime data or when transferring workflows to retain their states and execution history.
Import a Workflow
Importing a workflow from a file is done by clicking on the 3 dots → Import.
The Import Workflow dialog is opened. The user should browse and select the desired workflow. After the import is done, these steps will be done automatically:
- The workflow will be added to the Development tab.
- The row in the table will be selected.

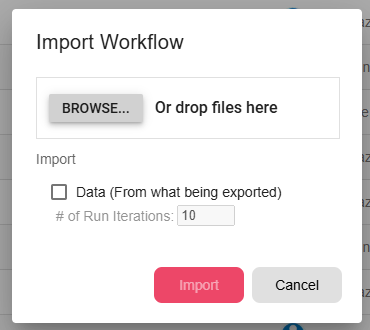
Import Workflow Dialog
- Browse and select the desired workflow file.
- Data — whether to include data from development or not. Choose the desired number of iterations to import.